Friday, April 22, 2022

Needing a large enough stone to finish the last arch


We arrived mid January this year and began the next phase on the Temple

To make the final voussoir shape for the last unfinished arch opening, we still had to find one more large chunk of any kind of unused leftover stone somewhere on the property, somewhere 

It might be ...

wasting away,

And mark and I needed still.  

Searching for that long lost shape of basalt.

( or granite , or even sandstone, maybe.)


I finally found a big chunk of Romero that was large enough to be carved down and shaped into the final keystone.  


Juilen did a fantastic job of carving and shaping the final arch stone (with right dimensions and the maximum size shape we could have got out of that odd red chunk of sandstone) 


...And with some wiggling and fine tuning it fit beautifully.
I suggested the crown motif at the top of the keystone and carved some foliage on the face.


Tuesday, April 19, 2022

Temple Art


.
This lovely piece of collage art showing the outside of the Temple of Imperfections was created by Sandy Oppenheimer. She and her husband John Fisher have produced wonderful works of art. Sandy creates pieces made with just different scraps of paper and John is a sculptor of stone and a watercolour artist. I’ve posted some of  John’s work on previous blogs. He came several times and painted us building the temple.


Here he is high up with us painting the activity on corbeled roof phase. 

To see more of Sandy’s amazing work visit her site at.

https://www.sandyoppenheimercollage.com/

Monday, April 18, 2022

Temple thoughts.


By the end of the second three-week building phase of the Temple of Imperfections, we had accomplished much . Six high battered walls, curving in to enclose a space that was taking on a very special presence. Two entrance arches completed and one remaining half finished. Lots of inside detail, including dry laid niches and seating. Outside walls and basalt corners waiting to support whatever we were going to finish off the top with.  


Before we left the Stonezone for that year, each of us reflected on the progress we had made. It had been rainy, dusty, cold, hot, and long hard work. Ironically the 'what', let alone the 'why', of what we were building, had still not been yet determined. 

All we knew was that it was looking good. Our gathering for phase three in 2021 would hopefully see the completion of the project. But then as you know covid happened.  


We were pleased to have worked so well 
with our favourite grumpy waller.

He put up with our humour and 
we put up with his grumbling. 


Here's the temple as we left it in Feb of 2020. It looked like rather colourful and brand spanking new.


Little did we know that Sean would be saying goodbye to the temple and all the work he had put in on the temple, not able to return with us in 2022, because of covid and health concerns.  
How would we finish off the corners. Would the temple have a roof? Would it be fully closed in or have an opening? What would the floor look like? Who would be involved in the project besides Mark Ricard, David Claman and me?


Saturday, April 16, 2022

 .

,

Our diverse universe continually creates deliciously beautiful things.

We enjoy this diversity as we taste and discover many of the various ingredients in this life. It may be true , that you never know what you’re going to get.

But a properly built dry stone wall is actually more like LIFE, than a box of chocolates.

It has more variety. More selection. It has more substance. Combines a wider combination of materials shapes and sizes. It fits and sticks together better. It lasts longer. It is more pleasing to look at. More tasteful. 

And- it’s not bad for you!

Look for less assortment and more diversity this Easter 

Happy Easter

Thursday, April 14, 2022

Hexagon Niche Motif


"We had three large canvasses to work on, on the outside. We were all agreed that each exterior panel of dry wall needed breaking up somehow. It would have been too much wall area between arches, otherwise." writes Sean Adcock. 


"John's initial idea was some sort of motif in each space, using the small white and black granite setts, each sett set to protrude in a hexagon star shape. Coming up with a sensible executable design was an issue, as was structure, and then given the basalt there was some question as to whether the protrusion would ever be noticed.  John tried a few dry runs but nothing great seemed to be happening.  Given the success of the small projection of the voussoirs over the arches, I think we almost got that one wrong however his eventual idea was a goody. "


"Anyway the idea of hexagons to in effect mirror the niche triangles in the pyramid wall, was as usual inspired.  Even if it caused me the usual headaches… could we fit them in?   Not sure how John came up with the right size ? I assume it was him, but they are just right. "   


"For me, thickness was the issue. They had to fit in the walls behind the seats, not something that had been allowed for.  They too would need a back, obviously another slab and yes we could just squeeze this in, and in fact the stone gods were smiling again, as it would make the top of the back of the interior seat too!   We hadn’t found big enough slabs for the seat, and were going to sit one sawn edge slab on another. The niche slabs would need to be lower and we were of one mind that they needed to be complete.  If they were in effect made up of the back of the seat there would be an obtrusive seam part way up.  The second slab made the back of the seat more organic and the step another imperfect but perfect detail, even the little triangle of exposed stone that was left in the back of one was is just another little imperfection adding to the interest and beauty of the whole."


"The niches are as deep as we could build them, but their shallowness also works I think, although it was a little worrying for overlapping the slabs, thank goodness for flat schist stones, and good length into the wall beyond the slabs.  As to the rest of their construction, I’m not placed to say how frustrating the process of constructing these hexagon niches was, other than noting John and Mark’s approaches differed. (Elizabeth worked on one of the hexagons too, with John offering advise) The three hexagons were to have relief sculptures in them eventually."


"My only other input here was the  curb lintel.  I know John wasn’t entirely convinced, I’m not sure I am even now, but the favoured shots are of doorways, so I'll reserve judgement until I've seen more photos of the finished temple .  However having butchered so many curbs, (made them smaller, not showing off their splendour)  it was good to honour three of them in longer form I think, and structurally my paramount thought was that as they extend beyond the end of niches, any load above them would be more likely to be transferred to the solid wall and not the thin skin/veneer forming the actual hexagon shape."


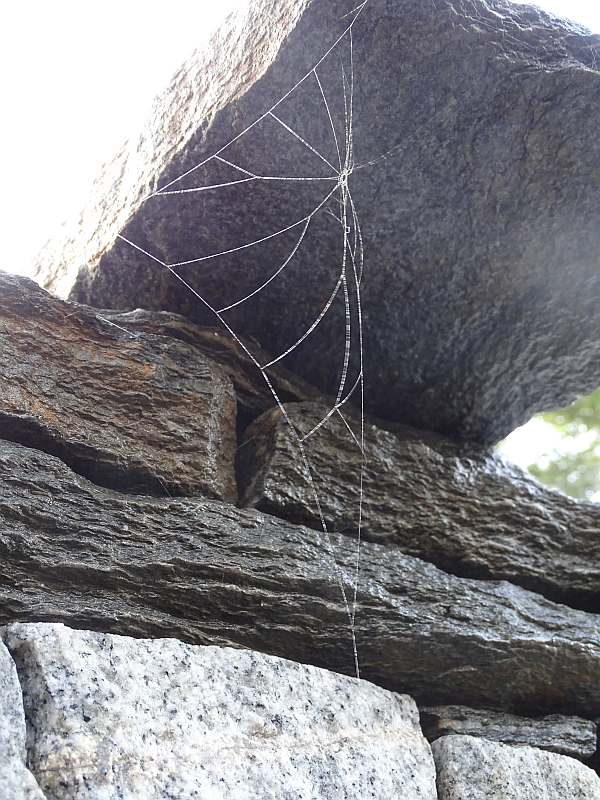
"My final contribution here was to have a throughstone on the centre of the top of each of these lintels, paying lip service to some structural theory or another 😊  In the photo a spider has made use of one waiting to be set on place, nature at its perfectly imperfect best?"


Mark is extending the height of the S W corner basalt with dressed granite curb blocks.


Some of the reclaimed San Francisco granite curbs came with with the original yellow street paint on them, which had to be painstakingly hammered and chiselled off. It's ironic to think that these lowly street curbs eventually turned into some of coolest blocks on the corner.


"As for the six outer basalt corners, and how to add more height to them. Much agonising over how to extend the basalt… having discarded the plainly mad idea of a second piece of basalt to stand on top.  It was decided to do all sorts of different blocks to bring the uneven nights of the basalt column corners to an even height. The curbs were readily at hand and it sort of works. I wasn’t convinced when I last left, but the plinth has tied it all together.


Wednesday, April 13, 2022

The upper black granite ring.

Sean wrote about the ring ..."Having reached what was the upper point of the curve on the inside wall there was still some debate as to where we were going from there. It was agreed however that we needed some form of cap that would facilitate whatever madcap scheme we (in reality John)  came up with.  The requirement was some sort of ring of stones of a relatively uniform height and some length to step out a bit but mostly go into the wall.  At this height the wall was some six inches or so out from its start point, which with the six inch ‘central’ deflection meant that the wall was effectively overhanging by around 12 inches.  So stones that were 24” long would have around half their length inside our start point at foundation level.  Elsewhere on site there was a collection of black granite lengths that fitted the bill, varying thicknesses and lengths and mostly around 6 inches in one dimension.  Once again we were killing some marvellous stones in the name of progress.  Somehow the job got delegated to me and a chisel…not your usual combination of tools.  I measured and estimated..  I reckoned we needed around 80 of them from highly random sample of thicknesses. Two foot wasn’t going to be possible but a satisfying number of 18” and lots of 16” would.  I tried to cut the lengths efficiently so nothing would be that short. This stone breaks marvellously well, even I can do it and it only took a couple of hours even with all my thinking time.  One of my abiding memories was the look on Peters face and his astonishment that I had achieved all that just with a hammer in a couple of hours, I think it even made up for the fact that he had got to move them all the way back across the property having only just moved them the opposite way.

Not sure who came up with the idea of 6 white 'spacer' ones, other than it was a safety measure as we’d be struggling to find more of the black granite if we ran out.  The 6 white ones were equidistant corresponding to the position of the basalt, basically starting halfway between the two doors and working out from there.  Pretty certain John came up with that one.  Another minor detail that very few will notice no doubt, in that imperfect black ring.  The black stones were set so that lengths were well mixed up and as they fanned out the tails were wedged.


Tuesday, April 12, 2022

Inner Niches


We wanted to do something on the inside walls besides the seats. Sean's whisky niche, modelled on a one litre bottle of Duty Free Glenlivet fit the bill.


He writes " The moon niche was the cause of much thought and discussion and not too much agreement at times.  We knew we wanted the seats to look at something, but what? John certainly had a desire to use some black and white setts somewhere, (pallets of granite cobble stones were available for using ) and the idea to to poke things out to create some sort of relief was decided upon. Initially John had suggested that for the outer walls, more on that later, but here inside he finally got to do it and then of course it transmuted to the outside door voussoir motif as well."


It was something about a dream I had of a moon cycle. Sean and Mark went with it.  It was very important not to alternate black and whites around the recessed mica schist circle  (but rather have one half of the circle black and the other white) with a polished moonstone at the top. Mark and Elizabeth worked together to shape these black and white stone setts so that they were tapered. Mark says the black ones were ridiculously hard to shape.


Sean goes on..

"The size of the circle I think John and I worked out together and we got it right not too big, not too small, nearly perfect." 


"Construction - once we had decided on the diameter, John made a semi-circular form and a corresponding template made for the cobblestone voussoirs, all cut by Mark and Elizabeth.  I started the building to get the upside-down half circle form in place and building up to the voussoirs to hold them. Halfway up the form was inverted and placement of voussoirs handed over to the others.  Then the marvellously inventive keystone.  The back was Sidney peak on edge with a ribbon of Romero sandstone through the centre."


"There is a secret compartment with a disguised movable stone door ". Sean calls it a 'safe'. " Not sure we should say much about this. Anyway there's a hidden ‘safe’ ie - a cubby hole in the wall which has a removable stone , and a nice marble tile base that no one will ever see.  There’s a knack to removing the stone, it's not going to happen by accident.  


"Has anything been hidden away inside yet? We had the idea of a photo of the builders. Maybe we should but a time capsule with this blog in it, and a glass of whisky for emergencies (and one of Peters giant joints?).  If you know there's a hidden niche you could probably work out where it is, otherwise no-one would ever guess."


Sunday, April 10, 2022

Keep your hearting level.


Taking a break from the temple to discuss hearting. For anyone who builds dry stone walls there is a better, more applicable version of the old adage 'putting the cart before the horse'. 

If a waller mounds the hearting stones up anywhere inside the wall higher than the outer building-stones in that course, it obviously will leave parts of the inside of the wall protruding, and thus be difficult to place any stones properly on top of that course  (or be able to place builder-stones far enough into the wall ) . 

So, one must remember not to put the heart-ing 'higher' than the course.

But remember, you still have to thoroughly heart 'before' the course is completed, and/or before you go on to fit more stones on top.

Saturday, April 9, 2022

The inner quoins and voussoirs of the seat niches


"Construction and fabrication of quoins was essentially same as for inner doorways" writes Mr Adcock, " with one big wrinkle… the ‘tie stones’ in the gap between the seat quoins spanned the whole gap.  This was another mad idea brought about by my concern that 2 shorter white granite runners would not leave much of a gap and they’d need to be the same height if it wasn’t going to get very messy, so why not run them all the way? " 

" Spanning was a mad solution which had knock on, problematic effects.  As with the shorter runners the curve was marked by eye/approximated and over that length there was plenty of room for error on my part. Looking back I suppose I could have sat down and worked out the supposed radius for the given height and worked out the offset for that length of arc etc.  Sometimes life is too short and even I resort to guesswork.  What’s more I don’t think it would have worked very well. I think perfectly executed stones of that size on a generally imperfect interior would probably have looked completely out of place, and thus in a way would have been completely, or at best far too, imperfect."


"The voussoirs here were quite long - going deep into the back of the seat opening the second voussoir on the left seat was a bit strange, we used a stone with the natural shape we needed, which didn’t really need angling.  I think we hoped we could carry on this way, on the more rustic inside.  However it didn’t work out like that, and whilst we didn’t cut uniform perfect extrados, that particular one really stands out for its 'imperfection'. " 


"Having mentioned the problem with cutting keystones here, the imperfections of the voussoirs initially made the idea of fashioning the keystones somewhat daunting, The solution was to have the keystone in two parts, placing and refashioning the front section was easy enough, dropping the back section in and then removing it for a bit more shaping would be another matter… The solution was to cut a shallow groove in it and for David Claman to lower it in (and pull it out) with a loop of wire."


"There was something wrong with a number of the voussoirs in terms of curved face and batter. Something went awry. This whole section caused problems for subsequent building as there was often a stone in the way of getting the profile just right and subsequent stones had to be offset from the profile… I was forever fiddling with flat spots and far less than perfect stones that were annoying me"


"I notice a wire from the centre pole in this photo… which reminds me that that was how I attempted to maintain some sort of curve for the inside voussoirs, using it as a rough guide (given that the pole was not necessarily vertical or in the centre (lol) or the wire was perfectly horizontal etc.  Basically it was more a case of checking the offsets on both sides were about the same for each pair of voussoirs rather than trying to make sure they were in exactly the right spot."


Friday, April 8, 2022

Seating For Two


More from Sean on the details of the Temple. "I think we decided on seat(s) fairly early on in the design process, I certainly drew a scaled drawing to work out if/how to fit a full seat rather than just a shallow perch.


I had to work out how much the wall would have curved in at seat level as the seat would need to project beyond this (my table of offsets helped here) to make (potential) feet placement more comfortable. And then how thick the wall would be at its narrowest point in to see how much space we would have to build… (not enough for a double wall but with plenty of 2ish inch flagstone slabs about, we could sit one vertically and then build the outer wall up against it, which makes for a more comfortable back anyway. Finding single slabs was to prove difficult, but even this worked out for the best… more on that later.


How did we hold the slabs in place??  I can’t remember and have no photos of this stage for some reason.

As I said, Im not sure when we settled on 2 seats… early on maybe… I think we always intended to use the double-wide wall between the back arch and the left arch. Two seat niches made sense. At some point we decided to have the seats same width as doors, as the gap between the doors was almost 5 seats wide it could be divided up quite well from an aesthetic viewpoint and we had the forms for arch from the doors to boot.  The height of the arch was simple expedient of working out a sensible height not to hit your head when sitting down or getting up.  


Seat base… well John came up with a plan. After some discussion of using more of the Sidney Peak mica schist bigger slabs, which in the end didn’t feel right, he found the lovely polished slab from a boulder of Art Horvath had sawn. It had an almost perfect inner curve and width, as if it was meant t be. Then the second Art Horvath slice from the same block, which was been used as a table, but Peter our client readily agreed to it being half buried into the seating niche. We are so lucky that he goes for these mad ideas. 


I always think back to the pyromid we built in 2011 and 2012, where we more or less buried amazing Romero lengths (sticks) to form the curb for the floor, with only a tip exposed , a detail most will miss.  These little touches add so much, but will be missed by so many.  Anyway Sidney Peak would have definitely been too imperfect for the seats in the Temple, and the end choice was nearly perfect.


Tuesday, April 5, 2022

Concaveman


My friend Sean is a kind of concaveman 

He builds, with the minimum of tools, better than anyone can.

He scribes a wall that's not just curved inside, 

but has concaved vertical batter right up its sides. 

It goes gently in, and then steps gently out. 

He goes up and over, and has no doubt   

He surrounds himself with concavity

Gradually, defying gravity.  

The wall wraps round him in concentric courses . 

Holding back all nature's forces, 

From caving in his womb of stone, 

Within the sphere of the unknown.


Monday, April 4, 2022

The Keystones- It's all fabrication.


When writing to me about the four keystones we needed to fabricate, Sean Adcock wrote  "All I remember is that they were fraught with potential disaster ". 


He explains. "However exact you are trying to be with 'sawn' voussoirs, imperfections creep in, even if you start off from both sides of the wooden former with everything parallel, a millimetre here and a 32nd of an inch there, and even though the voussoirs still might fit fairly nicely, and no-one can see any problems arising ,you might still get to measuring for the middle keystone, and the two faces you need to fit the keystone into are not parallel. One end is perhaps a sixteenth of an inch wider than the other, but you know the keystone has to be cut to fit, and there is NO wriggle room, and there will be no spare material available to make a replacement keystone. So then yes, it IS potentially a disaster."  


John fabricating a keystone

Sean goes on to write. " For that reason, no-one was keen to attempt to do a keystone for fear of botching it up. But  the four chisellers were given one each to do." 


"Needless to say I was not one of them, in many ways my job was to create problems for others to solve - and hats off to John, Mark, David and Kevin.  Each was just left to get on with it... and all the imperfections were perfectly sorted out."


        Mark Ricard dressing one of the key keystones  


David Claman - another key keystone fabricator 


And the fabulous Kevin Carman


Sunday, April 3, 2022

Outside voussoir pattern differing from inside arches


On the outside arched opening the treatment of the voussoirs,    was different. Sean writes " After a couple of stepped voussoirs had been cut for the outside and with the initial placements done ( and NOT having their tops all ending along a continuous slanted joint, but rather staggered) I saw the potential for the original 'triangular' design again .

John readily accepted the idea, and of course added a twist with the idea of projecting them.  After a bit of head scratching and checking I agreed it could be done, thank goodness for the wiggle room (provided by the extra bit of length in the blocks) and the reduced height of the internal voussoirs.  John also suggested we should have a tall keystone on the inside arches.  The step increased the width of the wall, as did the increased curve at the top of the profile and the stones were not quite wide enough, so rather than finish at a point, they were in effect truncated,  but even this imperfection worked and makes these keystones stand out even more I think.


I always liked the look of the original stepped voussoirs, although the regularity of the steps was a concern, as it would mean a lot of regular coursing, a lot of similar size stone and not a lot of space to manoeuvre this between the two doors on the inside and no basalt breaking up the stonework.   To make life somewhat easier on the inside we had, sometime before this visit, settled on a simple curved arch, much less wasted stone compared to the original concept of having the motif front and back…but this wasted my initial calculations,


but a good decision on the whole, I think having all the internal arches over doors and seats ‘even’,  makes it cohesive, and remove the necessity for completely regular coursing.  

The keystones… did we have separate blocks for these?  All I remember is that they were fraught with  potential disaster


Personally I think the eventual design really sings, producing a striking motif, far better than I imagined at any point of the process, and I think in many ways they exemplify how this project worked in terms of design, tweaking and execution.  An incredble symbiosis of ideas and designs, where we made changes with very quick additional tweaks and realisation of what was going to work.  Conceivably we were just making it up as we went along and just lucky.  Alternatively  we always seemed to know where it was going sometimes singing different songs (lyrics)  but always to the same tune and often producing interesting harmonies.  I think that we usually work like this , but somehow on this project for me it felt as if it really came together in spades."


Thursday, March 31, 2022

The Voussoirs


The Voussoirs?  Sean and I found it harder to remember how we actually did them. We have more photos of the making and placing of them than any other aspect of the project and yet can't quite work out what was going on.  


Sean writes “ I think my own trepidation and associated stress levels were at a build high with them.  The voussoirs were going to be made from pre-cut blocks of granite from art city… for ‘simplicity’ we needed one size block to suit all voussoirs and another for the springers, there was little room for manoeuvre or mistakes.


Initially there was a lot of head scratching… we had started the build - and so had settled on actual dimensions  in terms of height and width of opening, before we settled on the arches.  Having established batters was important because with increased height there was going to be a point where they were actually getting wider as the curve exceeded the 1:10 of the outside.   So I sat down at home in Wales and calculated what maximum widths would be, and quickly realized that the keystone (who’s top would be the highest point of the arch and hence the widest point) would need to be longer than the rest for example.  


During design it was decided that there could be separate sets of voussoirs - front and back- that interlocking them (making them throughs) would be far to  complicated so we chose to have them present a straight seam when viewed from underneath, an so each would have a slightly different length.

I drew scale drawings, made all sorts of calculations and notes based on projected sizes provide by John on sketch-up and eventually came up with a size for the voussoir blocks, allowing for removal of waste for shaping plus a bit of wiggle room in case we needed to amend anything- psychic, or just tuned into the way we work, can you actually plan how to ‘work on the hoof’? I even drew a scale curve for the springers to make sure that when placed at right angles to the door the tail of the springer would still be outside the curve so that it could actually be cut from a given block -basically this inside wall edge was much longer than the exposed edge on the curved inside… the straight outside presented no such problem. " 


"One thing I was sure of from the outset was that however hard I/we tried the two openings would not be perfect there would inevitably be some variation of widths cross and/or through as it turned out one was close to perfect width wise, but with a slight difference through, the other was closer though but with an inch or so difference across. These all complicated the build in terms of centring the forms, having to prop the odd voussoir slightly struggling to get the pre-cut blocks to accommodate the springers, introducing all sorts of imperfections."


"When it came to processing the voussoirs it was decided to utilize one sawn edge and cut the other face at an angle and adjust the base to the correct angle to make life easier.  Much sawing, kerfing, chiselling and grinding to get rid of the waste and produce another clean edge.  Nasty, noisy, dusty if my stress levels were at a high, I think John was probably heading off the chart, his sticking at it and often driving it at this point is one of the greatest and yet invisible aspects of the whole build.  In the end I think the clean cuts and the eventual motif set everything else off and was well worth the angst.  

Back to the actual process, once the springers were cut the block was placed on the former on which I had marked the curve of the inside face by eye – pure guesswork given that the radius of the curve would in effect be changing as height was gained, but again as long as it was not obviously too straight or overly curved it would be imperfect but I hoped would look right as long as it ‘flowed’."  


"Initially I couldn’t remember how the angle of the second face was determined.  For the springers I think I ‘simply’ aimed a straight edge (level) at the centre of the circle for the arc of the former, but that was a foot or so below the actual bottom edge of the form and marked the line with that.  Clearly not a tenable approach for the whole process.  I had started putting these notes together a couple of days ago and then I had a restless night full of voussoirs, dust and nonsense which include John’s beard – possibly instigated by my own current attempts to grow one- , but clearly in the middle was a wooden template.  This was used to get the second angle, with the base slightly cut to get a better angle onto the former.  It didn’t all go according to plan. " 


"All the voussoirs were cut for the front and placed before further processing (except the keystone) – that is batter of the face – a process repeated (more or less in tandem) for the inside.


I can’t remember how I marked the curve of the face on the inside voussoirs, clearly it wasn’t with my profile as the wooden form stuck out and was in the way… maybe a template?  I have a picture of the keystone in place with markings… maybe I aimed at this… One edge would certainly have been marked by scribing against the previous stone, it is clear that there was quite a bit of variation in the end.  When viewed close up the curve gets distorted, and the voussoirs are not of a uniform height and extrados does not necessarily parallel the intrados.  All sorts of imperfections but it wasn’t worth trying to iron out the minor discrepancies given the dangers inherent in 'killing' a stone."