Showing posts with label Technique. Show all posts

Monday, April 25, 2011

Stepping it up.

I know I go on about not using heavy machines and wonder why people don't work enough with stone using a more hands-on approach. Contractors seem to like to keep their distance from big stones and move them around at 'arms length' without considering the benefits of getting to know them more personally.

It occurred to me to take a more positive approach today and share a short clip about moving a big stone.

This is a big chunk of flag stone that got lifted on to the roof of the dry stone tool shed we completed last fall. The limestone slab must have been about 120 lbs. I got it onto the roof and into place without any help.

I used scaffolding and maneuvered the stone up on to boards pivoting the stone on edge up each board until it reached the top one. I jumped down to take photos at each stage to document of the process. I know it's not a great feat. And I know I could have done it easier with help. However it was a rewarding little exercise. It got the job done without bringing in a machine and more importantly it was another opportunity to enjoy 'thinking with my hands'. By the time I got the big flagstone slab up there I knew a lot about it and how best to make use of its shape and size on the roof.

Friday, February 4, 2011

Looking at the right angles. Part one.


You can't see it very well in this photo, but this random chunk of granite just about to be shaped already has a natural ninety degree plane appearing and has indications on its surfaces that it would be easy to break at right angles both to the bedding plane and the face plane. This seems to be the tendancy for much of this beautiful salt and pepper granite found along the Kern River Canyon and all around Lake Isabella in California. It is an amazing workable rock to use especially for squaring up corner stones. It is much different from the rubbery sandstone, the hard basalt and the flaky mica schist available out west, all which is difficult to split or pitch to even get a good face.

As you can see in the above shots, the rock was easily chiseled along the rest of the natural 'ninety' that had already 'showed up' in the stone.


Sunday, October 31, 2010

The Hallowed Wiener


When you are building a dry stone wall you often need to find stones with certain specific shapes. It helps to have names for these shapes so that you can ask the wallers you are working with if they've got a 'triangle stone' or 'hook stone' for instance, for using in a certain difficult section of the wall. The obvious name/shapes that come to mind are ones like 'flat one', 'square cornered' (or what we call a 'ninety' ), throughstone , builder stone , and cope stone. There is an elongated shape stone we have had to give a special name to because we often end up looking for these as we are building, in order to fill in certain irregular slots in the wall. The main attribute of these kind of stones are that they have to have length, so that when inserted into the wall they aren't going to fall out, but they can be of any height or width. They can also be any size. Eighteen inch ones are as valuable as six inch ones. These 'hotdog' stones, as we call them, turn out to be pretty valuable. You save them as you're going over the pile of stones, because you can be pretty sure you are going to need quite a few of them in the wall before it is finished.

Today, on 'Thinking With My Hands' it seemed appropriate to honour the humble 'Hotdog Stone', or as it is more reverently called, - 'The Hallowed Wiener'

Tuesday, October 19, 2010

'Hand' Rails


We used the same handrail design for the Rocktoberfest bridge last Thanksgiving as we did at the Macdougall public bridge which we built in Russell Ontario last year. The idea was something Scott Cluett came up with to solve the problem of not using up valuable bridge width with stone copes or parapets. Having the handrails secured beyond the 6 foot wide bridge surface gives ample room for two people to walk on the bridge side by side.

After I went over the final shape and dimensions with him, Scott who is a part time blacksmith ended up fabricating the metal brackets for both bridges. (He also drove all the way to Rockport Ontario with his wife Cindy and their son and two girls, and hand-delivered the brackets on Thanksgiving Saturday in time for the brackets to be installed. Thanks Scott )

They are made of heavy steel and have a thick rust resistant coating. The 4 brackets which span the width of the bridge and have sockets at each end, are built into the bridge just above the voussoirs. Stones are fitted around them and then over them, with a final layer of pitched stone over that so that they are held quite secure. Metal or wood posts can be inserted into the square 4 inch sockets connected to the brackets and then handrails attached to the posts.

In the case of the Landon Bay Centre hiking-trail bridge, which is being called Kay's Bridge, the posts and handrails are made from local red cedars. There was some concern while we were building the bridge that the protruding metal sockets would look out of place and/or the wooden posts and handrails would not look correct on a stone bridge. We were pleasantly surprised to see how unobtrusive the metal is and how the handrails and stone work together to create a pleasing rustic look.

Friday, October 15, 2010

Hand-Fitted 'Pitching' Music


Live musical accompaniment is a key element of our walling festivals. The musicians tell us they get inspired watching us work. This video clip starts off with the Ancient Music Duo of Port Hope (Fred Cody and Deborah Henderson) playing at the bridge and then morphs into an explanation on 'pitching'.

Pitching, sometimes called rip rap, is a type of paving technique creating a similar look to a cobble stone surface. It is an ancient road building technique in which medium sized rocks are set on end, or "pitched" up on their side. The stones are hand-fitted tightly together with aggregate packed into the gaps to tighten the construction. Think of a book in a bookshelf, only the spine is showing and the rest of the book is hidden. Modern trail builders all over the world have revived and perfected stone pitching.

Here in this video, taken during the building of Kay's Bridge at the Canadian Thanksgiving festival called 'Rocktoberfest' recently held in Rockport Ontario this year. Gavin Rose, a trail builder with the National Trust, who lives and works in Cumbria England explains a little bit about this paving technique which we used on the bridge.


Thursday, October 14, 2010

Little Hands and Softwood


Building a proper dry stone wall involves a lot of the same principles as stacking firewood. The important thing is that the pieces are laid into the wall, not along the wall. At Rocktoberfest last Thanksgiving weekend, our annual children's event involved a fun project teaching the basics of good structural placement, utilizing two full bush cords of softwood we had delivered to the park. The project was to create a temporary 'Andy Goldsworthy-ish' installation out of wood. DSWAC field director Eric Landman and his four boys along with waller Akira Inman and other festival participants built this twirling woodpile to demonstrate what little hands, with some structural guidance and a lot of imagination can achieve

Wednesday, October 6, 2010

Dry Stone Shape Rings A Buddha Bell


The bell-shaped structure we built in Toronto last weekend reminded some of us of stupa bells ( Buddhist commemorative monuments usually housing sacred relics associated with the Buddha or other saintly persons) like the ones at Borabador, a world heritage site on the Island of Java in Indonesiaat Borabador .

The similarities came about quite by coincidence. However we came upon the reminiscent interesting 'perforated' design for three reasons.

First, since we were building this thing only to be seen the one night of Nuit Blanche we needed it to be lit up effectively, and it seemed a good idea to have it radiating light out of the centre of the hollow bell by creating 'wider spaces' between adjoining stones in each course of stacked stones.

Second we wanted to build as big a structure as we could with the 13 tons of stone we brought to the site (that's a lot of stone to move build and take down in less than 8 hours !) and by spreading the stones, we used up less material, to ensure we would reach our 9 foot high goal for the bell.

Third and most important, by straddling stones that had a fist sized (or even foot sized) gaps between them we increased the stability of the straddling stones above rather than them having a tendency to pivot on stones below, because often their slightly differing heights make them more difficult to bring to level when they are butted up closer to each other. I had to keep telling people to spread the stones further apart and felt like I was teaching a dry stone wall course called Walling minus 101. It definitely felt like 'anti-walling' ( since it was hard to get some of the wallers to build in this different style at first) but it was necessary in the case of us trying to build something this sturdy in the short time we allotted ourselves.


Wednesday, September 22, 2010

Weighing in on different ways to lift heavy stones.


In keeping with the 'Thinking With My Hands' theme, I can count on the fingers of one hand the number of methods we have used to lift heavy stones up onto a tall wall or dry stone structure .


1. The first and most primitive way of lifting involves wooden boards or poles system. You simply slide or flip large rocks up along strong boards onto the top of the wall. In the video above you will see how DSWAC members managed to lift a huge lintel stone into place, as we completed the last stages of the traditional Scottish Blackhouse, which was built during last year's 2009 'Rocktoberfest'.

We had a fork lift there which could have easily done the job, but we felt it was important to do it manually, partly because we had all the manpower there that we needed and partly because none of us wanted to use machinery unnecessarily when we were building an authentic dry stone structure trying to duplicate how they would have authentically built it in the past


2. The three pictures above demonstrate a second method, that of using pulleys. We used a simple pulley from a rent-all store for all the vault stone we lifted onto the Cabane roof at the three day 2008 'Rocktoberfest' held near Cobourg Ontario. It was quiet, efficient, good exercise and extremely satisfying to build the entire structure without relying on heavy machinery.


3. The third method of using hoists is useful if the stones you are lifting are very heavy. We set up a hoist to lift the large rung stones that connected dry stone towers of this unusual 'rubble helix' which we built during the Canadian 'Rocktoberfest' in Garden Hill Ontario in 2007. This structure was a very unusual shape and required scaffolding to suspend a beam with a hoist attached to it to pull the long flat heavy stones up near the middle of the paired ascending spiraling dry stone walls.


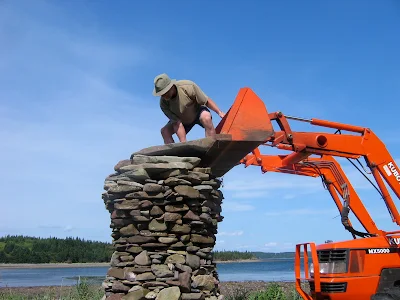
4. And of course there is the technique of going up along with the stones you are using. We have often had projects requiring that will we stand in the bucket of a front end loader tractor for example (filled with choice stones) in order to complete the top section of a tall structure. Here you see me finishing the Alban Beacon we built for Farley and Claire Mowat at their summer residence near St Peter's Nova Scotia in 2006.


5 Finally there is the method of having the stones moved up to your working area with a Caterpillar, Gradall or some other type of large excavator/boom tuck/rock-picker-upper type machine, as we did in Stone Symposium in Ventura, and at the Marenakos StoneFest held near Seattle recently.


Tuesday, September 21, 2010

Handily Stepping Out

Beehive Hut in Washington

Dry Stone Cabane in Ontario


Corbelling is a structural method of jutting stones or bricks out from a wall in ascending courses to support more and more material above. Each stone is placed so that the bulk of the stone is deeper into the wall than the part that is projecting. In this way a lot of weight of the building can be suspended over an open space.


In the case of dry stone huts, such as the beehive recently built in Washington and the cabane in Ontario, corbelling the stones towards the centre of the interior space defined by the circular walls eventually creates an enclosed stone ceiling and support for a roof. There are various methods and formulas for doing this. Obviously stepping out too soon or too far each course can make the structure unstable. Stepping out too slowly involves using a lot more material than necessary and makes the structure disproportionately tall.


The beehive corbeling involved long stones straddling the inside angle of another pair of corbelled stones below along the circumference of the opening.The outer corners of the stones are fully supported and it is only the middle overhanging 'delta' of the stone that projects out.


The corbelled stones of the Canadian cabane, on the other hand, have edges (and corners) that project unsupported but with more of their interior length acting as a counter-weight with wall material simultaneously placed on top so as to weigh down each course of corbelling below. The inside corners of these stones touch in a circle at the interior of the structure and the stones slant out and downwards into the wall so that any tendency for the corbel stones to slump is counteracted since each circular course of corbels would have to spread (and the open space get larger) before any stones could begin to drop.

In both methods of construction a functional roof can be created without having either to build a true arched vault or having to use wooden beams.

It is fascinating to see stones used in ways that their weight and mass seem to contradict the force of gravity.

Wednesday, August 25, 2010

Pillars of the Perverse


Speaking of twisted things, here is a photo I just came across recently of our dry stone helix being built in Garden Hill, Ontario, an unusual structure which I designed and was fortunate enough to have skilled members of the DSWAC ( Reid Snow, Evan Oxland, Patrick Callon and Stephen Nevin ) come and try to build it at the 2008 Northumberland Dry Stone Wall Festival. Like the two pillars we are building today, this was very tricky to figure out, especially how much to 'twist' the two walls as they curved upwards. The ten flat long stone rungs held the ascending walls in place and stopped the 'rubble helix' from falling over.

Our two twisted pillars were coming along well, but every stone has to be placed and shaped and repositioned several times before feeling good about it actually looking 'right'. (As if a twisted pillar can ever actually look right?) But seriously, this has turned out to be more awkward than we first realized. Recently we have been doing a lot of weird pillars. Entrance gate columns with curving Japanese style contours at one job, another one that had water flowing out from the top of it, two others that were over 6 feet tall and 4 feet thick. I'm thinking of calling this chapter in my life Pillars of the Peverse.

As promised, here are two visualizations I drew yesterday in Sketchup of this new 'twisted' project, to try to figure out how it would look - and, based on what we saw, how we would go about building it.


Below is a picture of how far we have come today on one of the pillars.


It looks like who ever was building this pillar was drunk! We have ended up using rebar as batter guides, twisting them clockwise and held in place at the top with a square piece of plywood rotated 45 degrees to the base and held with duct tape (you cant see that in this picture) Bungee cord string-lines help us to line up our stones with the 'splayed' geometry of the twisted sides.


Saturday, May 15, 2010

Hands On Inspection of an Arch and Walls Without Mortarboard or Scaffolding


Akira Inman is a stone mason in Toronto who came to our Rocktober Festival in Grand Valley in 2009 , and then through having met with Thomas Lipps (who we sponsored to be there) was invited to be a translator in Ventura last January, for the Japanese stone masons who came over for the Stone Symposium in California, and were demonstrating the ancient Anoh tradition of dry stone construction.

While there, he and I worked together and I invited him to do some projects with us including the wall repairs at Balsam Lake Ontario we just recently completed. During the week he worked with us I invited him to see this arch. He hung on with his 'hands' and took a closer look at this permanent arch I had built some years ago with Cam Reed, a homeowner who wanted to help and learn too about arches. (not so that he could then go and build them all over Ontario, but just so that he could say he helped build his one)

Anyway Akira told me the arch looked pretty cool and that it probably wasnt going to fall down.

For those of you who would like to learn a bit more about arches, I include a very good description of the 'former' centering used in bridge and arch construction written (and sent to me recently) by my friend Norman Haddow (a dry stone bridge builder, and yes you'll be relieved to know, a certified master craftsman waller with the DSWA of UK)

The Former

Prior to the 20th Century, the support for a new arch was called centering. The arrangement was similar to the technology involved in the construction of a wheel. Another method used for smaller arches was to pile sand on a wooden platform to create the desired shape for the stonework above. It was quite simple then to remove the loose sand when building was complete.

Nowadays it is much more common to cut the required shape on at least two boards then to cover these with strong cross pieces or with bendable strong materials such as marine ply. It is essential that the former of whatever type is strong enough to bear the weight of not just the arch rocks but also any material which will be built on top before the former is removed. Any area of weakness can result in failure.

The support for the former should be resting on a solid base. Bricks or blocks are ideal for the support as they can be easily knocked away when required.

Care is necessary when arranging these support so that the former can safely be dropped down to allow its removal, without interfering with the stone work. I have heard of people being required to set fire to the former to remove it as it was not possible to get it out any other way!

With a half moon former it is possible and useful when placing the arch stones to mark lines on the outside to indicate the required slope of the builders and especially the risers.

When the desired arch is not a half circle, the lines should be drawn from the theoretical centre.

Monday, May 3, 2010

Just Be Leaving Any Stone That Lets You Know It's Too Big To Handle.


It is a fairly practical idea to use the heavier boulder-type stones at the bottom of a wall so that you don't have to lift them and so that you can bury any irregular bottom surfaces of these stones in the ground and orient the better faces outward. If you use the bigger stones first, you will then be able to determine the number of irregular contour problems which you are going to have to deal with, (and fit other stones to) as you come along the wall with the next row (course) of stones.

The biggest stones you have in your stockpile should give you and idea of the width of the new wall you are going to build. If the wall is too narrow the boulders will stick out the sides of your wall, which is okay, if you are okay with how that looks. If the wall you are going to build is only a little bit wider than your biggest stones then you will not be leaving yourself much space to build on the other side of these stones properly. It's not good to be not believing yourself too much.

I generally plan on leaving at least a foot or more on the other side of the largest stones I will be using, and so determine my initial wall width that way.

If you do have to lift big stones up onto the wall don't lift them, roll them up a plank or up a ramp of stones.

Remember too that you don't have to use every big stone you come across. Some of them will be too big or so round that they will be almost impossible to build with and no matter how much you would like to believe they could work in the wall, they may in fact, compromise the structure and completely drain you from doing much more on the wall for the rest of the day.


Friday, April 30, 2010

Is cracking annoying if it is on purpose?


As much as we might want to still use a 'cracked stone' in the dry stone wall we are building but use it like 'two stones', because it is still the best fit we have to work with - and as much as it still is keeping to the rule of 'one over two and two over one' - as much as the combination is still structural, and the cracked stone is doing exactly the same job as two different stones would do - and as much as it would be really convenient to not have to look for a different solution and we know there are no stones that are going to fit as well - as much these things shouldn't matter at all and we say to ourselves 'who is ever going to notice anyway?' - it does matter and most people will notice, maybe not consciously but in some strange way a wall with even one purposely laid 'twin stone', unless it is a split stone with 'mirrored halves' laid together, not 'two ends' of a the same side of a stone, it is always going to look wrong. Don't ask me why, but the crack will not be seen as a normal joint. Maybe its because the crack will always be perceived as having happened after the wall was built and therefore it is sending a message to those studying the wall that something has moved and there are some uneven stresses on it. Maybe it is because the stone is giving away the fact that it has been laid along the wall not 'into it'. Anyway it is about as annoying to look at as it is to listen to someone cracking their knuckles. You can't really tell them why its wrong, but it is.

Wednesday, April 7, 2010

Handy 'Tip' with the Wheelbarrow


Often there are very big stones that need to be lifted and moved. The wheel barrow is the solution.


But if Im thinking with my hands I dont think I want to try lifting this baby into the wheel barrow. It will probably strain my back lifting it up and over and possibly crunch my fingers and pinch my thy on the edge of the wheel barrow as I try to lower it in.


The solution? Tilt the wheel barrow on its side. Roll the big stone into it. One arm on the lower side and one on the top, brace myself, and push.


Without any super human effort the stone and the wheelbarrow come to the upright position and the stone nestles nicely into the wheel barrow as it reaches the level positon. Voila!


Now I can easily transport the big stone wherever I want it along the wall.

I wish someone had showed me, or better yet, My hands had discovered this way of moving big stones in my earlier stone-moving days, back when I lifted so many big ones into wheel barrows the hard way.

Friday, March 26, 2010

No Hands!


Walling isn't backbreaking. It is labour intensive, but it isn't really strenuous work. That's why it is always funny to hear people say things like "Boy, that looks like a lot of work ! " or, " I could never lift those stones and do the kind of work you guys do all day".

People will often come by while were working and actually nod their heads and genuinely feel bad for us having to build walls all day for a living. Here we are enjoying the great outdoors, sun shining, no noisy machinery, no stressful deadlines, not confined to some fluorescent lit office working at some high stress job, just hugging stones all day, getting lots of exercise, making beautiful walls that will last hundreds of years, and people are actually feeling sorry for us.

As wallers go I am not really that strong. I generally don't lift really heavy stones. I think with my hands and lift with my legs or with boards or better yet, try not to have to lift them at all. A heavy stone can be rolled into place or simply moved into place with a dolly. If I have to lift a big stone, I don't lift it right up to my chest but let my legs do the work. I can sometimes move a big stone around like this using one hand. Sometimes if a rock is heavy enough you don't need hands at all. Here is one I lifted today. I guess if the stone got any heavier it would just float away!

Thursday, February 25, 2010

Fabrications- The Weaving of Tales or Hands.


The herringbone pattern can be an effective design solution for a variety of spacial challenges besides being a merely interesting ornamentation. The basic herringbone skeleton is very structural.

Surely it's great functionality, as evidenced in many fish skeletal systems, is the reason you see it used in all kinds of fabrications. After all, if it is good enough for a fishy tail why not a wall or even a tweed jacket? Even though it is an attractive pattern, Im sure this type of weave has its structural merits too.

Usually any kind of construction can be made stronger if you incorporate a diagonal element. In a herringbone dry stone wall the dynamic force of each stone placed at an angle is carried along the length of the wall rather than just downwards. Every stone you place by hand puts weight on its neighbour, whereas regular horizontal coursing leaves adjacent stones 'disconnected' with only the spanning weight of a few stones laid above them to keep them secure.

I remember seeing these type of herringbone walls in the south of England.

The parallel cleavage planes of the natural slate and shale stone found in some parts of Cornwall England, are often quite thin, and demand this radically different pattern of Cornish hedging. The flat smallish stones require great skill to build with because they are so thin. They are sometimes soft too, breaking easily under the weight of those above, and often slippery, so the hedge sides more easily develop a bulge; a badly-built slate hedge soon falls down. To counteract these tendencies this unusual way of building with shale and slate evolved to produce walls which Nick Aitken tells me are properly called 'claddiau' (one wall is a called a clawdd) They have favourite affectionate local names too: 'Jack and Jill', 'Darby and Joan', 'Kersey way'.

Someone told me once that Cornwall may actually have been named based on the distinctive alternating diagonal grain pattern seen in wheat or corn, which is so similar to the herringbone pattern of certain Cornish hedges, but when I wrote to Sean Adcock to ask about this theory, he assured me I could pretty much dismiss it as just an "interesting" tale.

Saturday, February 20, 2010

On the other Hand


The great thing about building walls with a random natural stone material is that you have many creative options. Blocks or bricks do not afford such choice. With walling you are not confined to a continuous repeating pattern using the same shapes all the time. This is the 'on the other hand' method of building. Variety is the spice of life and all that. What a pleasure it is to have to make creative decisions with every stone you pick up. I could use this OR then again I could use that shape. I suppose you could do that with bricks but it would be bit silly.

The choices that one has on hand when walling are one of the most important aspects of this craft. Just as it is neccesary to have a wide spectrum of grain sizes in a good lime-mortar sand, a good selection of sizes and shapes in the wall ensure many and various connections between all the stones in the wall.

If for instance, I was building a wall with a lot of the same size cantaloup shapes, these individual stones might touch their surrounding neighbours in perhaps 6 or 7 different places, whereas if I introduce some lemon wedge shapes and some smaller banana shapes I can improve the proportion of connectivity and therefore congeal everything like a dense fruit torte .

Just as healthy bodies need a balanced diet of fruit and vegetables, legumes and grains (this is the NEW Four basic food groups, by the way) a good healthy wall needs a variety of sizes and shapes of mixed minerals and rocks to build strong healthy walls.

Happily, there usually is this kind of varied stone selection to be found locally over much of the geological regions of Canada. To have the same sized stones shipped in from far way on pallets to your walling job is not only inefficient and wasteful it goes against this basic concept of walling, which is making sure there is an abundance of different choices of shapes. This variety is there not just to accommodate a practical and structural construction but also to ensure we will be looking at beautiful and interesting walls when we are finished.


Friday, February 12, 2010

Hand Tricks - Turning 'Rocks' into 'Stones'


Unlike the few problem-types we come across occasionally, (examples of which I described earlier this week) rocks are simply a pleasure to work with. Masonry restoration expert, and good friend Bobby Watt explains that the difference between a rock and a stone is that "a rock is simply an unemployed stone". It is safe to say all kinds of rocks will end up being very useful in your wall if they get half a chance. When you try to build with them, it's as if they actually 'want' to be part of your dry stone wall. They often have at least one or two nice faces. They are usually 'kind' faces too, the kind that are agreeable in terms of working together well with others in a wall.

Almost any rock will 'work' naturally in the wall because of its elongated shape or flatness ( making them able to not only show the best face but also really 'get into' the wall). Many others 'work' because of their ability to take the hard breaks and still stay together or their willingness to take up the slack and add 'heart' to the middle of the wall.

Anyone who 'employs' rocks and makes good stone walls will know you can make walls out of any of the three basic types of rock - igneous, sedimentary or metamorphic. ( as well as almost any combination of these naturally occurring geological materials ) While I cant quite say that 'I have never meta-morphic rock I didn't like', I have found most rocks, like most people, to be level bedded, cooperative, responsive and dependable, individuals who bond well with each other and are beholden to the basic principles of form and function. They make good stones.